
Reviewed · STIRLING TOURS
Braveheart (Battle of Stirling Bridge) Tour
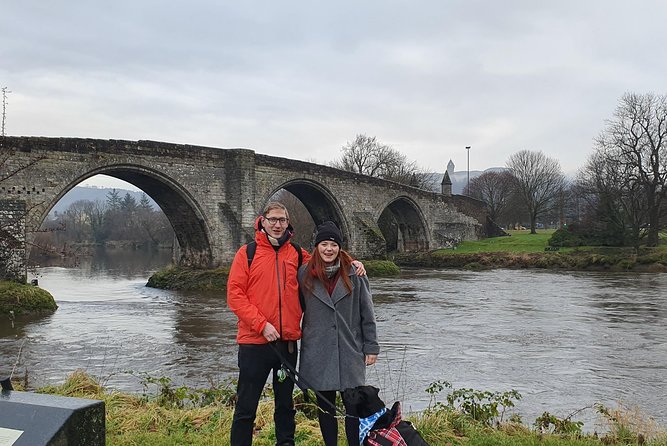
The most useful thing about this Stirling tour is that it shows you where the old wooden bridge once stood, even though the bridge itself has long vanished. With a tablet, maps, and a hand-built model, guide Steven explains how the crossing shaped Scotland’s victory in 1297 and sorts fact from Braveheart fiction.
I like the small group of no more than 15 because it gives you room to ask questions. I also like the direct setting beside the River Forth, where the story is tied to real ground rather than a museum display. The main drawback is simple: you spend much of the hour standing outdoors, and the tour depends on good weather.
In This Review
- Key points to know before booking
- Why Stirling Bridge matters more than the movie
- Meeting the battle beside the River Forth
- Seeing the lost wooden bridge
- Wallace, Andrew De Moray, and the fuller story
- A small group changes the pace
- What the full 60 to 75 minutes feels like
- The guide’s style and the personal welcome
- Is $34.45 a fair price?
- Weather, timing, and what to bring
- Who should book this Stirling tour?
- Should you book the Braveheart Battle of Stirling Bridge Tour?
- FAQ
- Where does the tour begin?
- Where does the tour end?
- How long does the tour last?
- How much does the tour cost?
- Is the tour offered in English?
- How large is the group?
- What battle does the tour cover?
- Does the tour discuss William Wallace?
- Does the tour include Andrew De Moray?
- Can I cancel for a full refund?
- What happens if bad weather cancels the tour?
- Are service animals allowed?
- Can most people participate?
Key points to know before booking
- The old bridge site is the star: You can see where the wooden bridge stood and learn how it collapsed during the battle.
- William Wallace is only part of the story: Steven also gives Andrew De Moray a proper place in the account.
- Expect a local guide’s view: Steven brings strong personal enthusiasm and explains competing ideas about the exact bridge location.
- Braveheart gets corrected: The tour deals openly with the film’s mistakes and the simplified version of events.
- It is short but focused: Allow about 1 hour to 1 hour 15 minutes, with little walking but some time on your feet.
- The meeting point is easy to identify: You meet on Laurencecroft Road by Stirling Old Bridge, beside the River Forth.
Why Stirling Bridge matters more than the movie
The Battle of Stirling Bridge was Scotland’s first major victory in the Wars of Independence. That sounds grand, but the place itself can seem modest at first. You meet near an old stone bridge, look across the river, and find no wooden battlefield monument waiting to tell you what happened.
That absence is part of the appeal. The original bridge is gone, and there is no grand physical relic marking the exact crossing. You need someone to explain how the river, the bridge, and the movement of the armies fit together.
Steven’s approach is to put the setting first. He takes you through the early lives of William Wallace and Andrew De Moray, then follows the events that brought them to the center of Scottish resistance. The story continues beyond the victory to their deaths and the legacy connected with their names.
That wider frame matters. A short Wallace talk can easily become a string of heroic legends. This tour gives you the military event, the people behind it, and the later meaning attached to the battle.
You will also hear corrections to popular film versions. The tour does not treat Braveheart as a history lesson. Instead, it uses the movie as a starting point, then explains where the screen story bends, simplifies, or invents details.
Other Scotland days people book alongside this one:
- The World Famous Underground Ghost Tour
★ 4.5 · 9,272 reviews - Underground Vaults Walking Tour in Edinburgh Old Town
★ 4.5 · 8,506 reviews - Loch Ness, Scottish Highlands, Glencoe and Pitlochry Tour
★ 5.0 · 6,854 reviews
Meeting the battle beside the River Forth
The stated meeting point is on Laurencecroft Road at Stirling Old Bridge, near the River Forth. The activity begins and ends at this same place, so you do not need to arrange a separate pickup or find your way to a distant battlefield site.
That makes this an easy addition to a day in Stirling. You can reach the meeting point using public transportation, and the location is just steps from the old bridge. Still, give yourself enough time to find the exact meeting spot, especially if you are relying on a phone map.
The tour is conducted in English. It is an outdoor walking experience, but the amount of walking is limited. You will spend time standing while Steven sets out the battle and points across the area.
This is worth knowing if you have mobility concerns or simply prefer a tour with frequent seating. The activity information says most people can take part, and service animals are allowed, but it does not promise seating or describe the surface in detail. Wear shoes that are comfortable for a short outdoor walk, and bring a waterproof layer for Scotland’s famously changeable weather.
Seeing the lost wooden bridge
The tour’s most distinctive feature is the effort to explain the bridge that no longer exists. You can view the location of the old wooden bridge and the area where it collapsed during the 1297 battle.
There is no remaining wooden structure to inspect. That means the quality of the explanation matters more than the sight itself. Steven uses a tablet to show details of the original bridge and to help you picture the crossing in its setting.
He has also built a model of the original bridge with his father. That is the sort of homemade teaching tool that can make an abstract story click. It gives you something concrete to picture while Steven explains why the bridge was so important.
The exact location of the old bridge has been discussed through different theories. One particularly useful part of the tour is the willingness to discuss possible locations and newer information instead of presenting every detail as settled fact.
You should not expect archaeological ruins or a large interpretive center here. You are paying for an explanation of a difficult-to-see site. If you enjoy reconstructing the past from maps, terrain, and competing ideas, this is a strong fit. If you need visible ruins to hold your attention, the setting may feel sparse.
Wallace, Andrew De Moray, and the fuller story
William Wallace naturally receives much of the attention. His name is tied to the battle, the national story, and the film that made him familiar around the world. Steven uses that interest well, but the tour also highlights Andrew De Moray, who can be overlooked in more popular accounts.
That balance improves the experience. The battle was not the work of one lone hero standing in for an entire country. You learn about the men who helped lead the Scottish victory and the events that pushed them into the front line of the Wars of Independence.
The tour follows the pair from their earlier days through the battle and onward to their deaths. This gives the talk a clear shape rather than stopping at the famous victory.
Steven’s enthusiasm is a major part of the experience. He presents the material with warmth and plenty of energy, and he makes time for questions. Several comments about the tour emphasize how friendly and welcoming he is, not just how much information he knows.
That personal style will suit you if you enjoy a guide who treats history as a living story. It may be less suitable if you want a quiet, strictly academic presentation with no side comments or personal touches.
Same glens and lochs, a completely different day out:
- Loch Ness & Highlands Small-Group Tour from Edinburgh with Cruise
★ 4.5 · 6,022 reviews - Edinburgh Castle: Guided Walking Tour with Entry Ticket
★ 5.0 · 5,540 reviews - Edinburgh Castle Guided Walking Tour in English
★ 5.0 · 5,214 reviews - Edinburgh: Glenfinnan Viaduct, Glencoe & Fort William
★ 5.0 · 4,337 reviews
A small group changes the pace
The tour is capped at 15 people. That is small enough for the guide to keep the group together and respond to individual questions without turning every exchange into a public announcement.
The group limit also helps at a site where there is no formal visitor infrastructure. You are not being moved through a large attraction with a fixed route. The experience depends on being able to gather near the guide, listen, and look toward the river or bridge area as the story develops.
A small group can also make the tour flexible. In one particularly positive account, a very small booking allowed Steven to adjust the schedule and add extra hospitality. That should not be treated as a promise, but it shows how the format can feel personal when numbers are low.
The advertised duration is approximately one hour to one hour and 15 minutes. Plan for the longer figure so you are not rushing to your next activity. The talk is compact enough to fit into a morning or afternoon, yet long enough to cover the battle, the people involved, the bridge theories, and the later legacy.
What the full 60 to 75 minutes feels like
The tour begins with the place itself. Steven introduces Stirling Bridge and the river setting, then explains why the wooden crossing mattered to the armies involved.
From there, the story moves into the lives of Wallace and De Moray. You are not simply handed a battle date and a list of names. The guide explains how these figures reached the moment that made them central to Scottish history.
The middle portion focuses on the battle. You learn how the bridge affected movement and why its collapse matters to the story. The tablet and bridge model help fill the gap left by the missing structure.
The final part connects the victory to later events. Wallace and De Moray’s deaths and the legacy they left are part of the tour, so the story does not end when the fighting stops.
The tour ends back at the meeting point. This makes the timing predictable, but it also means you do not finish at Stirling Castle or another major sight. You will need to plan your own next stop.
The guide’s style and the personal welcome
Steven is the named guide associated with the experience. His replies to visitors show a strong sense of personal welcome, and that warmth comes through in the way the tour is presented.
He often adds small touches, such as video links or local suggestions, and he is happy to answer questions. There is also a clear family connection to the tour’s teaching materials, including the model bridge built with his father.
The tone is friendly and sometimes playful. You may hear local expressions, personal observations, and affectionate references to Scotland’s historical heroes. This is not a scripted audio tour.
That warmth has real value in a place where the physical evidence is limited. A dry explanation of a vanished bridge could leave you cold. An engaged guide can help you see the riverbank as a strategic site and understand why the crossing became so famous.
One practical note deserves attention. A past booking error led to a scheduled tour guide not arriving. Steven apologized, offered a refund, and offered to arrange another date without charge. This appears to have been an isolated mistake rather than the normal experience, but it is still a reminder to confirm your plans if your schedule is tight.
Is $34.45 a fair price?
At $34.45 per person, this is not a bargain attraction in the sense of entering a large museum for a small fee. You are paying mainly for Steven’s time, research, local knowledge, visual aids, and ability to explain a site with very little surviving structure.
The value is strongest if you already care about Scottish history or want more than a quick photograph by the bridge. In that case, the tour turns an easy-to-miss location into a meaningful stop.
The price is harder to justify if you only want a brief look at the bridge. You can see the area without paying for a tour, and admission to the outdoor site itself is free. The paid element is the interpretation.
The small group helps the value. A maximum of 15 people offers a more direct experience than a large coach excursion, especially when you want to ask about Wallace, De Moray, the bridge, or the film’s historical errors.
If you are visiting with two or three people who share your interest, the cost buys a focused hour with a local specialist. If your group includes people who do not enjoy history, you may find the talk feels too specific.
Weather, timing, and what to bring
The tour requires good weather. If poor conditions force a cancellation, you are offered another date or a full refund.
That policy is useful, but you should still think about the weather before booking a tightly packed day. Stirling can be wet, windy, or cold even when the forecast looks manageable. Bring a waterproof jacket, and dress for standing outside rather than only walking between indoor sights.
Some people have enjoyed the tour in hail and heavy rain, but that does not mean bad weather improves it. Clear conditions will make it easier to look across the river, follow the guide’s pointing, and stay focused on the explanation.
Book at least a little ahead if possible. The experience is booked an average of 22 days in advance, and the 15-person limit can matter during busy periods.
You receive a mobile ticket, and confirmation comes at booking. Cancellation is free up to 24 hours before the start time. Less than 24 hours before the start, changes and refunds are not accepted unless poor weather causes the operator to cancel.
Who should book this Stirling tour?
I would choose this tour if you have watched Braveheart and want to separate cinema from the real battle. Steven’s approach is especially useful for that purpose because he openly tackles the movie’s inaccuracies rather than ignoring them.
It also suits anyone with a serious interest in Scotland’s Wars of Independence. The attention given to Andrew De Moray makes the talk broader than a standard William Wallace presentation.
Families and mixed-age groups may enjoy the bridge model and the visual explanations, though the tour still depends on an interest in history. The short duration helps if you are fitting it between other Stirling sights.
You should think twice if you want a fully paved, seated, indoor experience, or if you need a tour with major ruins and displays. This is a standing outdoor talk at a site where much of the original structure has disappeared.
You might also pair it with a visit to Bannockburn. Steven offers a separate Bannockburn tour, and the two subjects complement each other well. The Stirling Bridge experience explains the 1297 victory, while Bannockburn takes you to another major moment in the struggle for independence.
Should you book the Braveheart Battle of Stirling Bridge Tour?
Book it if you want the real setting behind the legend and appreciate a guide who can make an almost invisible bridge feel important. The best reasons to go are the small group, Steven’s strong personal delivery, the tablet and model used to reconstruct the crossing, and the effort to give Andrew De Moray his due.
Skip it if you only want a quick view of the bridge or if outdoor standing is a problem. The site has few visible remains, so the tour’s value depends on your interest in the explanation.
For most history-minded visitors, $34.45 is a fair price for a focused local introduction to Stirling’s most famous battle. Just leave room in your schedule, check the weather, and arrive ready to listen rather than expecting a movie set.
FAQ
Where does the tour begin?
It begins at Stirling Old Bridge on Laurencecroft Road, beside the River Forth in Stirling, Scotland.
Where does the tour end?
The activity ends back at the meeting point.
How long does the tour last?
The tour lasts approximately one hour to one hour and 15 minutes.
How much does the tour cost?
The listed price is $34.45 per person.
Is the tour offered in English?
Yes. The tour is offered in English.
How large is the group?
The tour has a maximum of 15 people.
What battle does the tour cover?
It covers the Battle of Stirling Bridge in 1297, Scotland’s first major victory in the Wars of Independence.
Does the tour discuss William Wallace?
Yes. It covers William Wallace’s early days, his role in the battle, his death, and his legacy.
Does the tour include Andrew De Moray?
Yes. Andrew De Moray is one of the key historical figures covered during the experience.
Can I cancel for a full refund?
Yes, if you cancel at least 24 hours before the experience start time. Cancellations made less than 24 hours before the start are not refunded.
What happens if bad weather cancels the tour?
You are offered a different date or a full refund if poor weather causes the activity to be canceled.
Are service animals allowed?
Yes, service animals are allowed.
Can most people participate?
The activity information says most people can participate. It is an outdoor experience with limited walking and some standing.
Just added around Scotland
- Full-Day Private Speyside Malt Whisky Trail Tour from Grantown-on-Spey★ 5.0 · 22 reviews
- Northern Islands RIB Tour★ 5.0 · 15 reviews
- Dunrobin Castle Private Tour★ 4.0 · 4 reviews
- Guided Walks in Grantown-on-Spey★ 5.0 · 35 reviews
- ULLAPOOL PORT Cruise Ship Tour, Ardvreck Castle, Rocks & More★ 5.0 · 5 reviews
- CANYONING in Laggan Canyon | Roybridge, Scotland★ 5.0 · 22 reviews
- Explore Glenfinnan – Adults★ 5.0 · 5 reviews
- Stirling Run Tour★ 5.0 · 7 reviews
Stirling Tours, compared.
Stirling Old Town Daily Walking Tour (11am & 2pm)
Read our review →

3 Hour Private Tour of Stirling Old Town and Stirling Castle
Read our review →
Private Tour of the Highlands, Glencoe and Castles from Stirling
Read our review →
Stirling Castle and the Secrets of the Old Town Private Tour
Read our review →Browse the lists this tour appears in